HOFMANN POWER WEIGHT
Assembly instructions
Assembly of knock-on-weights
 |
 |
 |
 |
| SELECTION OF THE RIGHT WEIGHT: Prior to installation, select the appropriate weight from the HOFMANN POWER WEIGHT range on the basis of the rim shape. The choice is determined by the rim design. The rim flange thickness varies (steel rim/aluminium rim) and different rolling processes are used. Put the weight beside the rim flange before installation to check the shape. |
POSITIONING THE WEIGHT: Put the weight to the calculated place. Before knocking the weight on the rim, make sure that the clip is correctly touching the rim flange. |
APPLYING THE WEIGHT: After positioning of the weight, apply it with an adequate tool (such as mounting pliers or hammer). To install the weights, no more than two forceful knocks should be used. A higher number of knocks can damage the coating of the weights. |
CHECK THE CORRECT HOLD OF THE WEIGHT: After the installation, please ensure a thight fit of the weight. |
Assembly of adhesive weights
 |
 |
 |
 |
| PREREQUISITES: The surface to attach the adhesive balance weight on the wheel rim must not exceed a maximum slope of 15 degrees of axial direction (hub direction).The surface energy of the surface to be bonded to the wheel rim must be at least 32 mN/m. Measured with test ink, e.g. Arcotest.The permissible processing temperature must not be less than 10°C [50°F]. The wheel rim surface must be free of grease, silicon and dust and be dry. There must not be any adhesive residues or adhesive tape left on the adhesive surface of the wheel |
PRE-TREATING THE RIM: DClean the rim thoroughly with a cleaning agent that is compatible with varnish (e.g.IPA 70 %). |
PRE-BENDING THE WEIGHTS: Separate the correct gramage (as calculated) from the bar. Mould the shape of the weight to match the rim radius (with protective film). PLEASE NOTE: You need to bend the weights gradually, otherwise they will break apart at the joins. You should bend the weight to a little more than the rim’s radius. |
STICKING THE WEIGHT ON: Attach the weight to the calculated point on the rim, making sure that the weight is distributed evenly either side and the weight is parallel with the edge of the rim. PLEASE NOTE: Press down on the weight hard, working from the centre to the left and right. A minimum pressure of 10 N/cm² is required. |
Assembly of adhesive weights on motorcycle rims
| Dynamic imbalance is frequently also referred to as an imbalance in two lanes. The adhesive weight type 706 from the HOFMANN POWER WEIGHT range is ideal for compensating this kind of imbalance. These weights can be stuck onto the narrow rim shoulder (to the left and right-hand sides of the spokes) provided that the glued surfaces are within the permissible inclination angle of 15°. If the glued surfaces exceed an inclination angle of 15°, there is a risk of the adhesive weight losing its ability to adhere due to the centrifugal forces involved. | 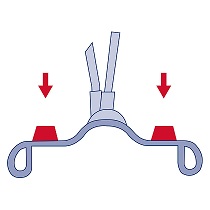 |
Assembly of safety weights
 |
 |
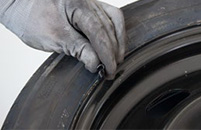
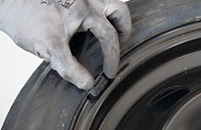
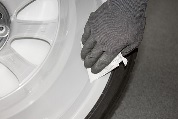
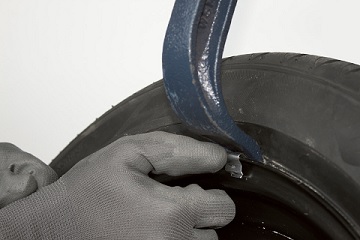
| INSERT THE CLIP: Use the tyre compression tool or a pneumatic tyre compression tool to squeeze the tyre off at the point where the weight is going to be installed just far enough in order for the rim flange to be exposed. Attach the clip at the required point. Remove the tyre compression tool. The clip will be pressed between the rim flange and tyre, where it will remain secure. |
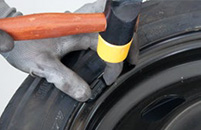
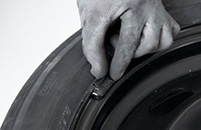
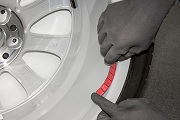
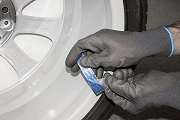
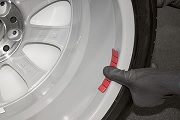
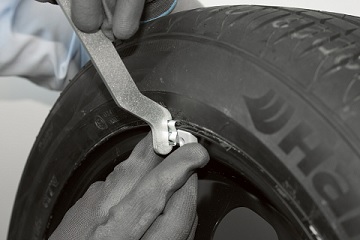
MOUNT THE WEIGHT: Use the clip fitting tool to lift the clip so that you can push the coated weight body underneath it. Push the weight in the right grammature under the clip. Gradually tilt the clip fitting tool back so that the clip is able to engage in the specially provided recess in the weight body. |
Videos of the products from HOFMANN POWER WEIGHT
Knock-on aid
No more blue fingers! Injury-free and safe mounting of impact weights. Watch the video to find out how it works.
Balancing Compound
Balancing is important – for truck tires, too. And with HOFMANN POWER WEIGHT balancing compound, this is now easier than ever! Watch the video to find out how it works.
TPMS U1 Service Kit
Install the TPMS U1 service kit from HOFMANN POWER WEIGHT correctly! We show you how it works.